Hello, dears!
I absolutely LOVE the art we’re going to do today! I think this might be my favorite piece of art I’ve done for Art Lab, or at least one of my favorites! Here’s the stunning art inspiration for today:

HOW NEAT IS THAT? :O After pondering for a while, I came up with the idea of making the design into a constellation-type doodle with a watercolor background. I think the finished result looks gorgeous! Ready to start? Alright!
1. Selecting a canvas depends on your supply of both patience and time. You’ll need both for this project. 😉 If you have a limited supply of the aforementioned, I would suggest making this an ATC. If you’re bored and want to spend a while just making art, use a sketchbook page.
If you like clean white borders as much as I do, put strips of washi tape around the edge of your paper.

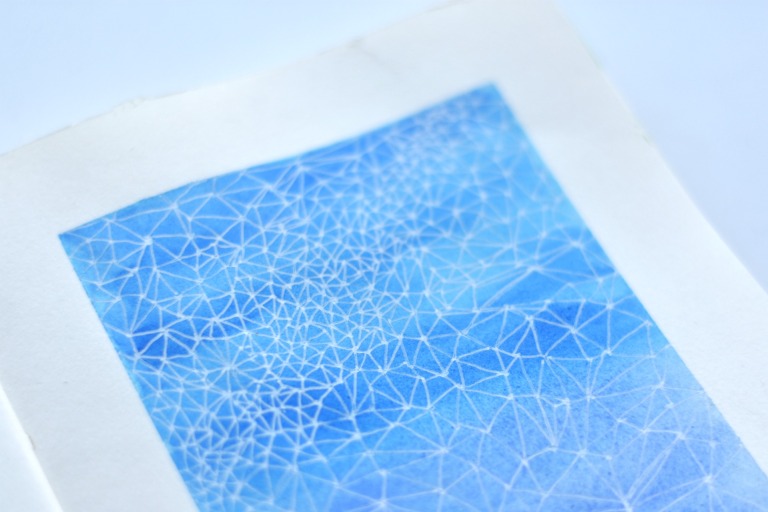
2. Paint a graded wash of watercolor, starting with dark blue at the top and fading into purple and then pink at the bottom.

3. Using a white gel pen, make a diagonal band of densely clustered dots across the top of the page.

4. Fill the rest of the page with dots, spreading them further and further apart from each other as you move away from the first band of stars.

5. Now for the fun (but tedious) part! Connect the dots. You don’t have to connect every dot to every other, but that’s what I did. For maximum impact, you’re going for a bunch of triangles – if an area has more than three sides, you missed a dot. Don’t cross over any lines or it will get too muddled.


6. Once you near the right bottom corner, take a break and sketch in the outline of a tree on a hill. (I should have done this before I started the stars, but I didn’t. I recommend learning from my mistake. 😉 ) Make an elongated cloud shape on a trunk, and “cut out” a few holes in the leaves and branches for extra realism.

7. Mark the sketch with a bunch of dots to connect later. Don’t do them too close together, but the fewer dots you use, the more geometric your tree will be.

8. Connect the rest of the dots.

9. Now take a black brush pen or Sharpie and color in between the lines. 😉

10. Ta-daa! Now for the great reveal…

SOOOO PRETTY!


I really love how this turned out, and I hope you guys do too! Do you think you’ll make this? If you do, I’d love to see it! Click here to see how to send it in and add it to our Art Lab gallery.
Thanks for reading, dears, and have a lovely day!
***Allison***

Beautiful 😍😍 I’ve gotta try this!!
LikeLike
Thanks, dear! YES, you totally should! It’s a ton of fun. 🙂
LikeLike
Wow! So gorgeous! 😀
LikeLike
Thank you, Hannah! 🙂
LikeLiked by 1 person
That’s really beautiful!
LikeLike
Why thank you!
LikeLiked by 1 person
You’re welcome!
LikeLiked by 1 person
That is just beautiful. I may just go and try it soon! 🙂
❤ Faith Elizabeth
LikeLike
Aww, thanks! And yay, I hope you can!
LikeLiked by 1 person
This is so beautiful!
LikeLike
Why thank you!
LikeLike
I am totally going to do this! Problem. I don’t have– and am unlikely to obtain– a white gel pen. XD
But I like the idea! I might be able to think up something with it.
Thanks for the post!
LikeLike
Woohoo! I’m so glad to hear that! Aww, that’s too bad. I suggest trying white acrylic paint! It should work if you have the right paintbrush.
Sure thing – thanks for commenting!
LikeLiked by 1 person
ooohhhhh I LOVE THIS IDEA!!!!! It turned out so beautiful! When I graduate, I need to get back into drawing. ~Emma
LikeLike
THANK YOU SO MUCH! Ooh yes, I hope you can. 🙂
LikeLiked by 1 person
Ah, this was so beautiful! I’ll make sure to try it someday! ❤
LikeLike
Thank you so much, Mukta! And YES that would be great!
LikeLiked by 1 person
This is so cool! I’ll make sure to try it soon 😉
Also, what theme do you use for the art lab?
Rhi xxx
LikeLike
Yay, thank you! And we use the “Sketch” theme. 🙂
LikeLike
Thank you Allison!
LikeLike
Sure thing!
LikeLike