Episode 52

Bonjour les amis!

How are you all doing? With school in sight, let’s focus on enjoying the rest of summer.

Our project today is DIY paint markers.

You will need:

  • Empty and clean waterbrush
  • Liquitex Flow-Aid (it will last you a long time!)
  • Acrylic Paint
  • Water
  • Eyedropper or syringe
  • A container with a tight lid
  • Wipes
  • Scratch paper (to test the ink)
  • Gloves (optional)
  • Patience

Step 1. Gather Materials

thumbnail 12

I’m using a rather worn Niji water brush and Liquitex Soft Body Acrylic paint in Blue, Black, and Titanium White.

Step 2. Squeeze about 1 teaspoon worth of paint into your lid-able container.

thumbnail 13

Step 3. Mix the paint up with a toothpick or chopstick.

thumbnail 14

Step 4. Pour about 3-5 drops of Liquitex Flow-Aid. It helps to dilute the acrylic paint without having the paint separate. Add about 1 tablespoon + of water until the solution is rather runny.

Step 5. Pour into your waterbrush.

thumbnail 16

It takes trial and error to make a solution that will work with a water brush. I would lean more on the watery side.

Live creatively!

signature


Episode 48

Hello fellow artists! I hope you are having a wonderful summer so far! Today I wanted to share a really beautiful technique for painting watercolor sunsets. It is seriously so easy, and fun, and well it’s just a blast!

Continue reading

Episode 29

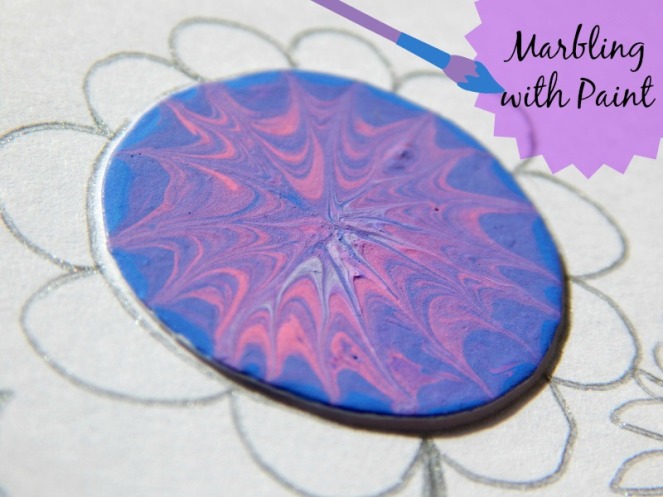
Yay, I’m so excited to show you this art today, guys! According to your requests, here is a tutorial for the technique I used to create the last envelope art in this post. It’s a super fun technique and the inspiration behind it is absolutely beautiful too. So let’s get started, shall we?

First of all, the…

Art Prompt:

I found this really amazing spray paint artist who has a YouTube channel called “Skech Art.” He is SO good! When I think of spray paint art I picture graffiti, but he makes actual paintings on canvases. Here’s the video:


Okay, so I could do without the unicorn (I think it kinda distracts from the gorgeous scenery), but isn’t it AMAZING?! There’s another equally amazing video here that you should really watch too. 🙂

Alright, now for the tutorial. This technique is great for lots of things, like envelope art, ATCs, or just a painting on watercolor paper, but I think it would look especially nice on a canvas. (I used a piece of white cardboard, though, if you’re wondering.)

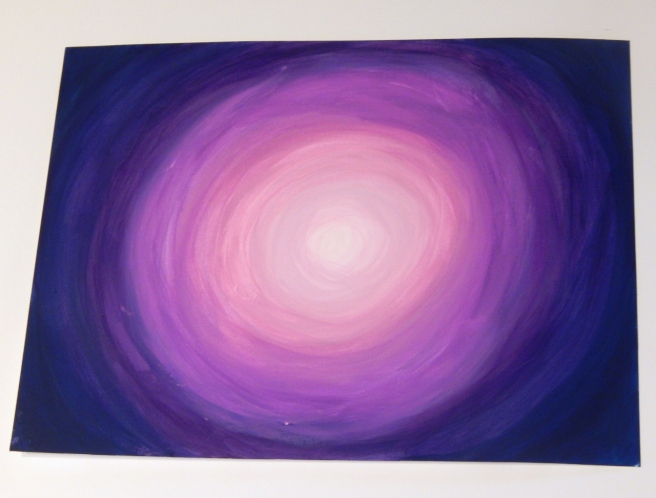
1. You’ll need a few different colors of acrylic paint that go together well, plus white and black. I used pink, a few different shades of purple, and a dark indigo.

Paint the outer ring with your darkest color. Don’t worry if it gets a little messy, like so. 😉

art 1 (1280x974)

2. Blend a ring of the next darkest color (like dark purple) into the outer ring you just made, overlapping the paint colors so they blend.

art 2 (1280x960)

3. Now just keep adding new rings of color, making a gradient from dark to light. Use white for the very center. Tip: Blending works a lot better if the paint is still wet, so try to do these rings all at once instead of letting them dry between circles.

Ahh, it’s looking so pretty, isn’t it?

art 3 (1280x973)

4. Add some long black blobs for islands to the bottom third of the picture, like so.

art 4 (1280x960)

5. The islands kinda look like they’re floating, so we need to anchor them. Use your ugliest brush with coarse or frazzled bristles to paint some white streaks under the islands and create the illusion of water. Tip: Don’t use much paint and make sure your brush is nice and dry to create perfectly imperfect streaks.

art 5 (1280x979)

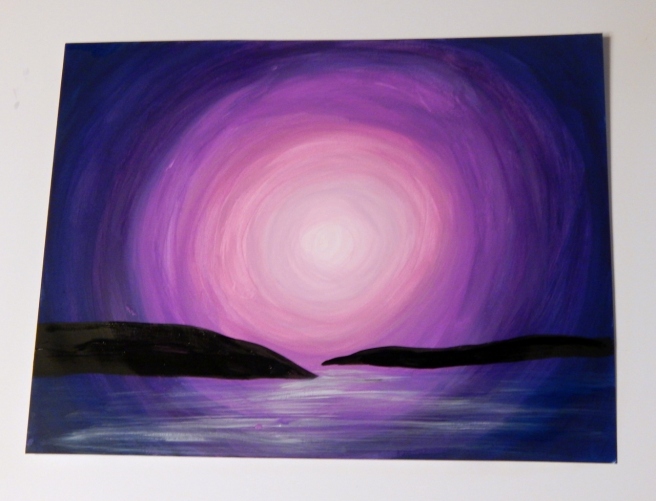
6.  The islands still need shadows to cement them into the picture. Paint some black streaks right under the islands to make their dark reflections. (Wow, that sounds scary. XD )

art 6 (1280x960)

7. This is probably the hardest part: painting the tree. If you’re good at drawing trees, go right ahead and start painting, but if you’re not the best, like me, it might help to practice a few on a scrap piece of paper. My tree didn’t turn out quite as good as I had hoped, but you know what – that’s okay! You can always make a new and improved picture next time. 🙂 It also helps to look at some pictures of trees for inspiration.

Tip: I’ve found that it makes the branches look more realistic if they’re wider where they join the main branch and then taper to a point.

I also made a bumpy line for trees on the second island. 🙂

art 7 (1280x929)

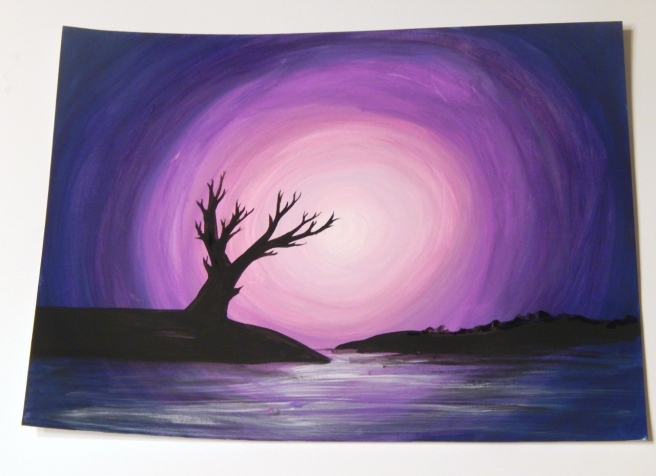
8. The stars are the finishing touch. Use your coarse paintbrush to splatter white paint all over your picture. Actually I should have done this part before I painted the islands, but I just painted over the black silhouettes and it turned out fine. 😉

Tip: It’s easier to splatter the white paint if you thin it with just a bit of water. Then tap the paintbrush handle on your finger to flick paint across the paper. If I do this again I think I’ll make slightly fewer stars because it can get overwhelming.

I also like to make a some twinkling stars by painting small crosses over a few of the dots.

art 9 (1280x960)

Ta-daa! And there you have a beautiful galaxy-moonset-silhouette-ish picture. 😀

galaxy silhouette 1 (800x600).jpg

I hope you enjoyed this tutorial, my friends! Do you think you’ll give it a try? If you do, I’d love to see your artwork! Click here to see how to submit in your artwork to the Art Lab blog and help us fill our gallery.

Thanks for reading, dears!

***Allison***

Episode 13

marbling-with-paint

Welcome back to Art Lab! Today I’m going to show you how to make some fun marbled art inspired by some this gorgeous art prompt!

Technique: Marbling

Art Prompt:

Ooooohhhh! Marbled/swirled paint.:

{via}

Wow. Aren’t those marbled canvases just stunning? I’m going to show you how to create your own mini marbled masterpiece using just acrylic paint and a toothpick! (I’m afraid they won’t look quite the same as the canvases above, but… XD 😉 )

Step 1:

Spread a layer of paint on your paper (heavy paper such as cardstock works best). Make your layer nice and “juicy” but not too thick.

allison-002-1024x768

Step 2: Pour or drip a little bit of different colored paint onto your base paint. Here I added a drop of purple and pink-purple (which was already kind of marbled together in my palette).

allison-003-1024x768

Step 3: This is the fun part! Drag your toothpick through the paint to marble it. It works best if you drag through the paint without scraping the paper underneath. I chose to drag from the center point out which made a beautiful starburst pattern!

allison-004-1024x768allison-014-1024x768

Here are a few other marbling suggestions:

Start with four different colors:

allison-009-1024x768

Go wild with your toothpick! Swirl it, drag it, move it up and down and side to side…

allison-012-1024x768

Make a swirly pattern by drawing a spiral with your toothpick:

allison-011-1024x768

Isn’t this neat? I put a drop of white down, then purple, then white again, and dragged the white outwards to make a star-ish shape. Then I dropped some white and purple spots around. Beautiful!

allison-019-1024x768allison-017-1024x768

You can even make marbled hearts:

Start with a few drops of paint close together on a contrasting color…

allison-026-1024x768

Then drag your toothpick through the drops vertically: (Sorry, this example didn’t turn out too well, but trust me, it looks really neat when it works! 😛 The top two hearts are what they’re supposed to look like.)

allison-027-1024x768

If you swirl the paint in your palette before dropping it onto your paper, you can get more blended designs:

allison-024-1024x768

Or you can simply drop paint onto paint:

allison-025-1024x768allison-021-1024x768

allison-025-1024x768

allison-008-1024x768

The paint may take a while to dry since it’s pretty thick. When it’s completely dry you can hang up your canvas/sign your art, or make a “sampler” ATC of your experiments!

allison-039-1280x960

allison-040-1280x960
I especially love how this turned out. 🙂

allison-041-1280x960allison-042-1280x960allison-043-1280x960

What do you think? Have you marbled with paint before? I love seeing how each piece turns out – they’re so different but so beautiful.

***Allison***


Episode 11

Hello, dear readers! It’s Allison here, back with Episode 11. Today I’m going to show you how to concoct some colorful cacti. (That was fun to write.)

This is the gorgeous inspiration I found:

Pretty!:

{via}

I’m going to use a canvas and acrylic paint for the first piece of art.

Begin by painting the background of your picture. I scooped up both white and blue paint on my brush to make a more textured background.

colorful cacti 1

Now you need to populate your desert. Here are some ideas for cactus shapes: (And yes, I am aware that these cacti look rather sickly. Maybe their desert was extra dry this year or something. XD

colorful cacti 2

Paint your cacti the same way as the background – blending together different colors of wet paint onto the canvas.

colorful cacti 3

And finally, embellish your plants! Add dots, dashes, and beautiful blooms. Ta-daa!

colorful cacti 4

I also made these ATCs:

I had fun painting the flowers with the one on the left. So pretty! The one on the right was inspired by an actual cactus we have that looks kind of like that.

cacti.JPG

I hope you enjoyed today’s prompt. If you were inspired to make art from this post, we’d love to see it! Get the details on how to send in art on our Art Gallery page.

***Allison***